
new setup, step by step (pic heavy)
+2
James
chris_street
6 posters
Page 1 of 1

 new setup, step by step (pic heavy)
![]() by chris_street Sun Feb 26, 2012 5:02 am
by chris_street Sun Feb 26, 2012 5:02 am
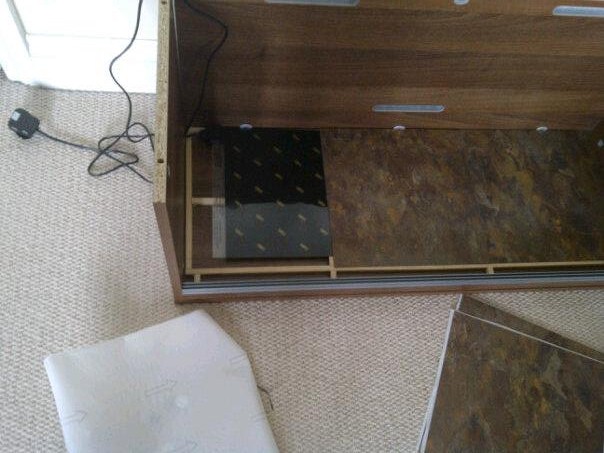
Ok so its finally all done and working great, took nearly all day but have got my new setup done. Took a few pics along the way to show the false floor was made so the heat mat could circulate the air.
First all the stuff I used:

Second is the false floor made from 10mm x 10mm wood for the heat mat to do on top. (action shot). Really easy to do, didnt nail it all together in the viv i did that after this photo so it can be lifted out when a deep clean is needed. I also added extra supports for the vynal tiles after this photo

This next shot shows the first peel and stick tiles stuck to the wooden frame I made and the heat mat inserted under. I didnt peel the paper off the part over the heat mat so the heat mat can be removed when needed as well.
So that was the floor complete, next a few shot of the cables i ran up the side of the viv and the decor. I nails cable hooks to the viv to keep the cable out the way and all tidy. Also a log look moist hide that opens in half.

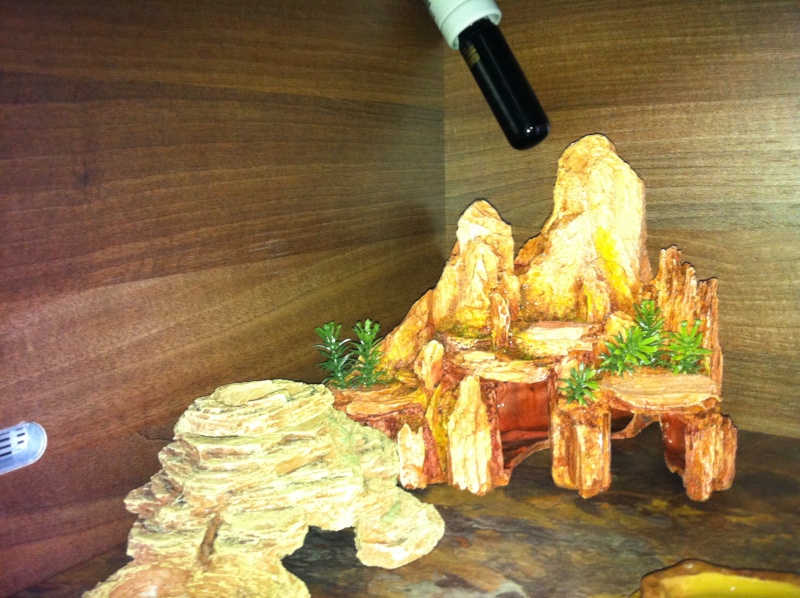
next up the cool side of the tank, complete with rock hide and rock meal worm and calcium dish

I have also installed a 35W blue moon light bulb incase it gets a bit chilly in the night. everything is hooked up to a habistat double probe thermostat also have digital probe thermomiter
full viv

Now the man of the moment, currently called Chester Copperpot aka the worlds wierdest leo, he liked to sleep standing up

Can anyone ID his morph please, would be great to know
Looks nice and healthy and has a big fat tail, was a bit worried about the size of him compared to the hides but he can fit ok, gunna weigh him soon once he settles in.

First all the stuff I used:
Second is the false floor made from 10mm x 10mm wood for the heat mat to do on top. (action shot). Really easy to do, didnt nail it all together in the viv i did that after this photo so it can be lifted out when a deep clean is needed. I also added extra supports for the vynal tiles after this photo
This next shot shows the first peel and stick tiles stuck to the wooden frame I made and the heat mat inserted under. I didnt peel the paper off the part over the heat mat so the heat mat can be removed when needed as well.
So that was the floor complete, next a few shot of the cables i ran up the side of the viv and the decor. I nails cable hooks to the viv to keep the cable out the way and all tidy. Also a log look moist hide that opens in half.
next up the cool side of the tank, complete with rock hide and rock meal worm and calcium dish
I have also installed a 35W blue moon light bulb incase it gets a bit chilly in the night. everything is hooked up to a habistat double probe thermostat also have digital probe thermomiter
full viv
Now the man of the moment, currently called Chester Copperpot aka the worlds wierdest leo, he liked to sleep standing up
Can anyone ID his morph please, would be great to know
Looks nice and healthy and has a big fat tail, was a bit worried about the size of him compared to the hides but he can fit ok, gunna weigh him soon once he settles in.

chris_street- Regular Member
 Status : No status yet...
Posts : 56
Join date : 2012-01-17 LGF Points : 186

Re: new setup, step by step (pic heavy)
![]() by James Sun Feb 26, 2012 6:56 am
by James Sun Feb 26, 2012 6:56 am
Cool set up, looks like a bell albino to me, but then my morphology isn't very good so some one else on here should be able to help you better 

James- Loyal Member
- Status : Wants a ferret :)
Posts : 208
Join date : 2011-09-23
Location : cornwall,england LGF Points : 656
Re: new setup, step by step (pic heavy)
![]() by gothicgurrrl Sun Feb 26, 2012 7:38 am
by gothicgurrrl Sun Feb 26, 2012 7:38 am
Wow, your viv is looking great
And I'm not very good at morph I.D, but I think it's an albino
And I'm not very good at morph I.D, but I think it's an albino

gothicgurrrl- Forum Staff

- Posts : 2962
Join date : 2011-02-27
Location : North West of UK (Lancashire) LGF Points : 6090 -

Re: new setup, step by step (pic heavy)
![]() by Mardy Sun Feb 26, 2012 8:15 am
by Mardy Sun Feb 26, 2012 8:15 am
Awesome setup and thanks for taking step by step pics, I'm sure that'll be very helpful for those looking to DIY.
You gecko looks like a pretty jungle bell or rainwater albino from the above. An eye pic will help in determining what he is.
Bells are easy to tell apart by their reddish/pinkish eyes.
Rainwater have darker silverish eyes.
Tremper tend to have lighter silverish eyes with a slight red pupil.
You gecko looks like a pretty jungle bell or rainwater albino from the above. An eye pic will help in determining what he is.
Bells are easy to tell apart by their reddish/pinkish eyes.
Rainwater have darker silverish eyes.
Tremper tend to have lighter silverish eyes with a slight red pupil.

Mardy- Valuable Member

- Posts : 669
Join date : 2011-07-12
Location : SoCal LGF Points : 2105 -
Re: new setup, step by step (pic heavy)
![]() by chris_street Sun Feb 26, 2012 8:34 am
by chris_street Sun Feb 26, 2012 8:34 am
he has really red veins in his eyes if that helps, he's being left in his room to settle in but will take some pics of his eyes once he feels at home. he has gray eyes with really red vein though.
At the moment he's going round the whole place, behind the hides and over the mealworm bowl.
may have a name change soon as well. This can be put in the DIY section if it helps anyone and the photo can be used in the morph ID if there isnt a pic of his morph
At the moment he's going round the whole place, behind the hides and over the mealworm bowl.
may have a name change soon as well. This can be put in the DIY section if it helps anyone and the photo can be used in the morph ID if there isnt a pic of his morph
chris_street- Regular Member
- Status : No status yet...
Posts : 56
Join date : 2012-01-17 LGF Points : 186
Re: new setup, step by step (pic heavy)
![]() by Mardy Sun Feb 26, 2012 8:51 am
by Mardy Sun Feb 26, 2012 8:51 am
Sounds like a tremper albino.
Mardy- Valuable Member
- Posts : 669
Join date : 2011-07-12
Location : SoCal LGF Points : 2105 -
Re: new setup, step by step (pic heavy)
![]() by Krakatoa Sun Feb 26, 2012 10:20 am
by Krakatoa Sun Feb 26, 2012 10:20 am
Those hides are really cool, I haven't seen them before. Awesome setup, and gecko! 

Krakatoa- Member
- Status : No status yet...
Posts : 16
Join date : 2012-02-07
Location : Florida LGF Points : 54
Re: new setup, step by step (pic heavy)
![]() by chris_street Sun Feb 26, 2012 10:47 am
by chris_street Sun Feb 26, 2012 10:47 am
All products of eBay, pretty cheap stuff
chris_street- Regular Member
- Status : No status yet...
Posts : 56
Join date : 2012-01-17 LGF Points : 186
Re: new setup, step by step (pic heavy)
![]() by geckochick89 Sun Mar 18, 2012 2:17 pm
by geckochick89 Sun Mar 18, 2012 2:17 pm
Where did you get him? He is probably a tremper albino.

geckochick89- Regular Member
- Status : 25 leos and counting...
Posts : 70
Join date : 2012-03-18
Location : California, USA LGF Points : 212 -
Re: new setup, step by step (pic heavy)
![]() by chris_street Sun Mar 18, 2012 9:23 pm
by chris_street Sun Mar 18, 2012 9:23 pm
Got him from a local reptile store (uk). The guy who owns it used to be a breeder so is pretty clued up but just said he's albino... Didn't get anymore info then that apart from he "should be" 2-3 years old haha. Doesn't look like other tremper albinos when I have looked at them but guess that is just markings etc, he's one sexy gecko
chris_street- Regular Member
- Status : No status yet...
Posts : 56
Join date : 2012-01-17 LGF Points : 186
Re: new setup, step by step (pic heavy)
![]() by geckochick89 Mon Mar 19, 2012 5:37 am
by geckochick89 Mon Mar 19, 2012 5:37 am
Well unfortunately the only way to be sure would be to breed him. I say tremper mainly because they are the most common/abundant type of albino out there, and the problem is that they come in lots of different shades of albino. I have 3 or 4 trempers that look nothing alike. So my educated guess would be tremper.
geckochick89- Regular Member
- Status : 25 leos and counting...
Posts : 70
Join date : 2012-03-18
Location : California, USA LGF Points : 212 -
Re: new setup, step by step (pic heavy)
![]() by chris_street Mon Mar 19, 2012 6:23 am
by chris_street Mon Mar 19, 2012 6:23 am
Cool, looks like a tremper jungle albino when I have been looking at pictures, but what ever he looks cool and that's the main thing.
Just about to go feed him, he's so lazy when it's feeding time, takes about 2 steps and if he can't get dinner he just waits to be given it from tongs haha. What a character!
Just about to go feed him, he's so lazy when it's feeding time, takes about 2 steps and if he can't get dinner he just waits to be given it from tongs haha. What a character!
chris_street- Regular Member
- Status : No status yet...
Posts : 56
Join date : 2012-01-17 LGF Points : 186


Page 1 of 1
Permissions in this forum:
You cannot reply to topics in this forum|
|
|